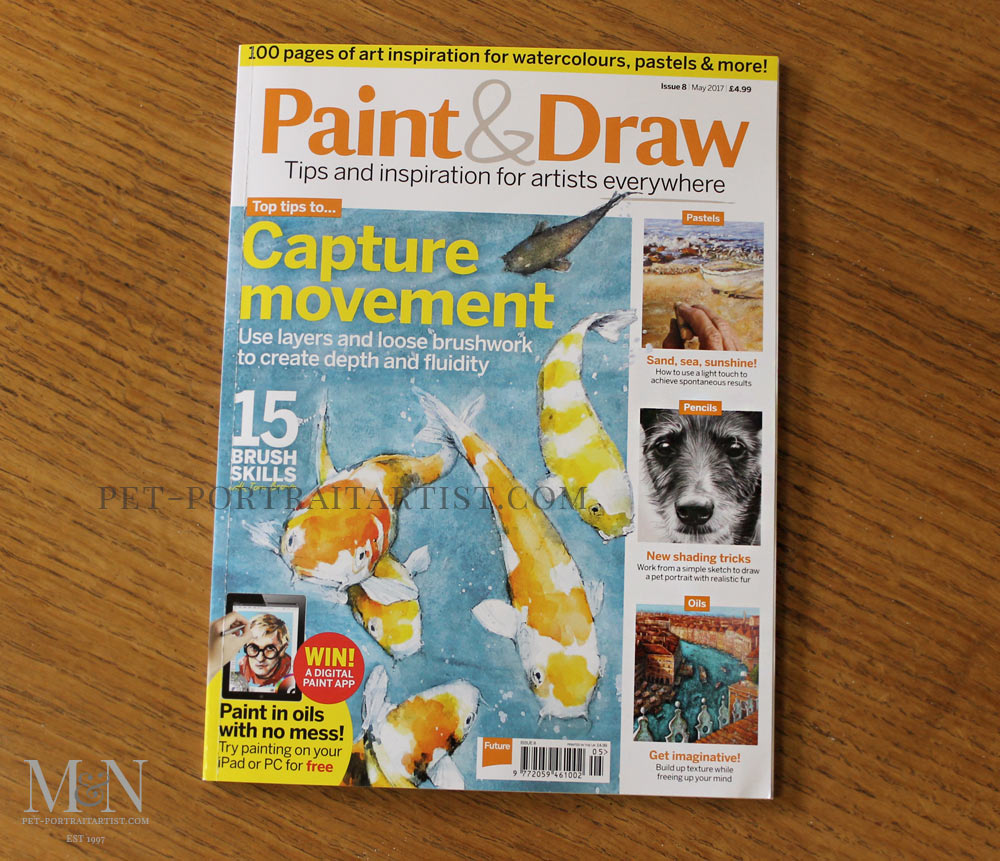
Welcome to my Paint & Draw Magazine Article. Contributing to the magazine was very exciting! Although every single portrait is unique and tackled in slightly different ways this gives a good idea of my process. It was such a privilege to be featured and I was absolutely thrilled when they asked me to contribute to their cover workshop article. The editor of the Draw & Paint magazine said….
Just a quick email to say thanks a lot for all your amazing work on the Paint & Draw cover workshop. It’s on sale this Thursday in WHSmith, some other supermarkets and to purchase online here: http://bit.ly/pad_issue8
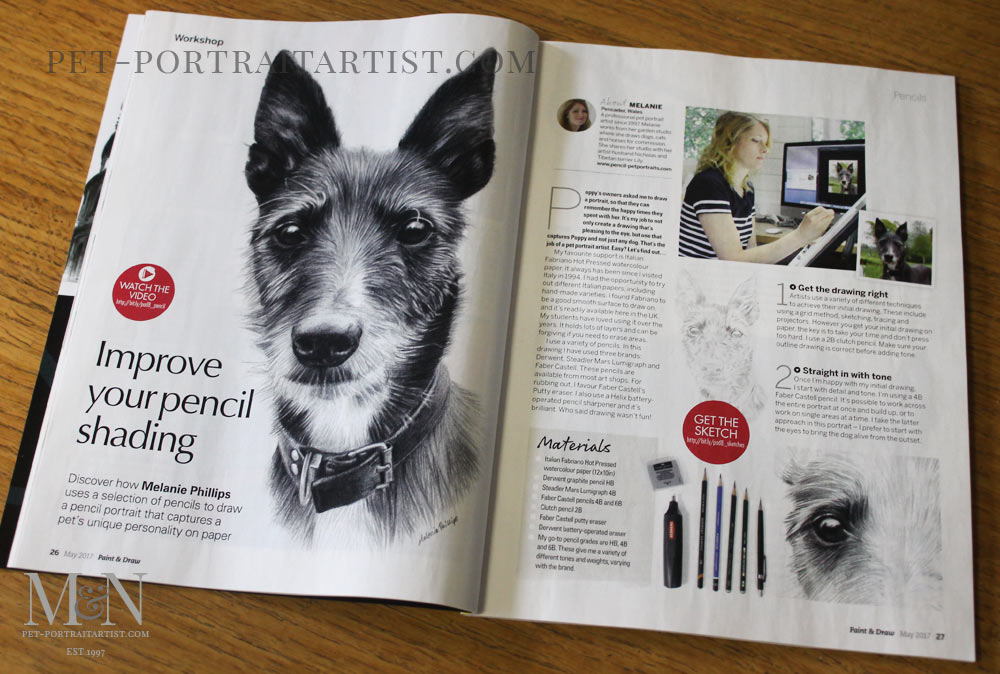
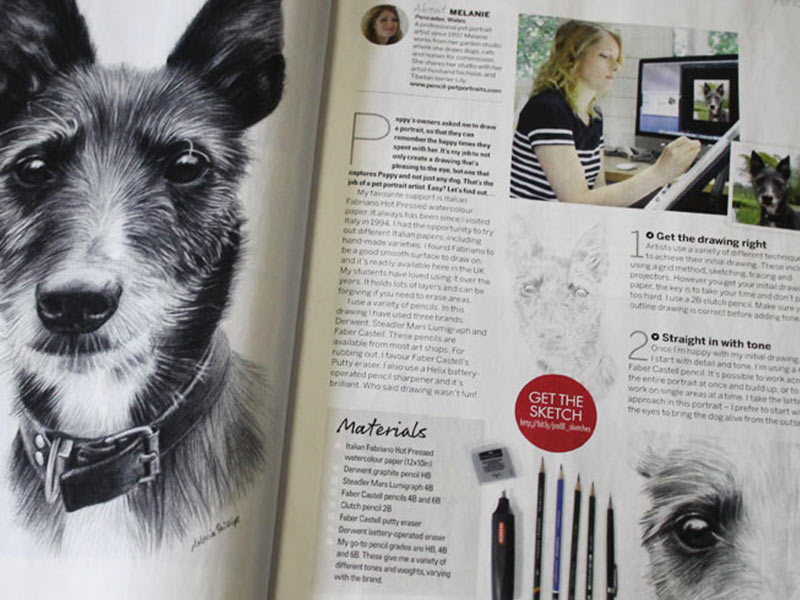
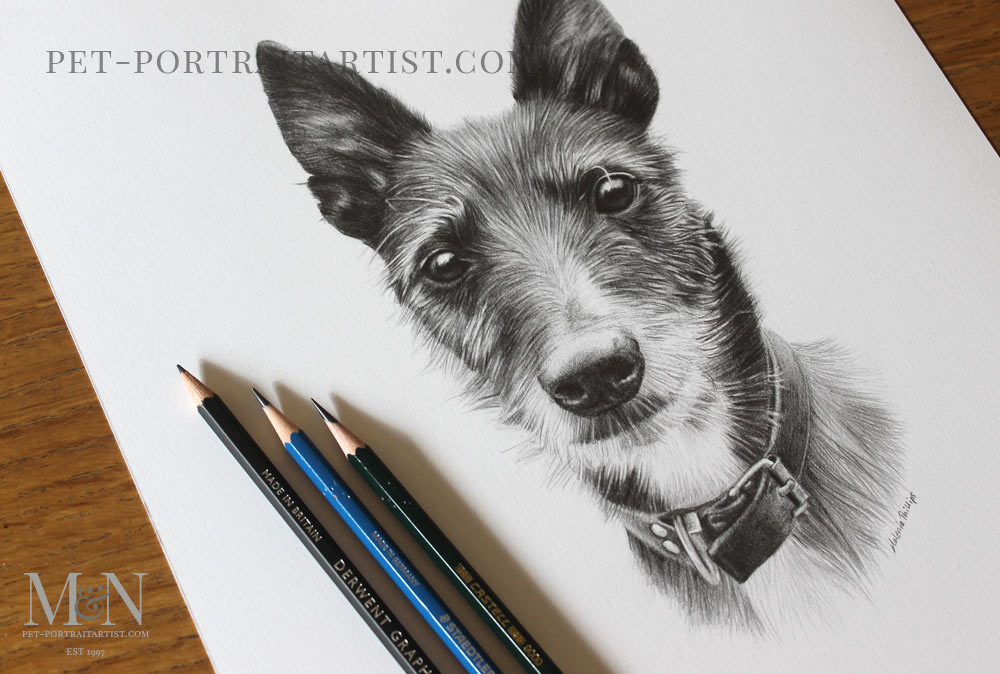
I chose to base the article around a pencil drawing of a beautiful Labrador called Poppy. The dog belonged to Adam Lafosse, who kindly allowed me to use her for the project. I wanted to demonstrate not only the technical aspects of pencil work but also the emotional process of capturing a pet’s personality through careful layering, soft textures, and attention to detail.
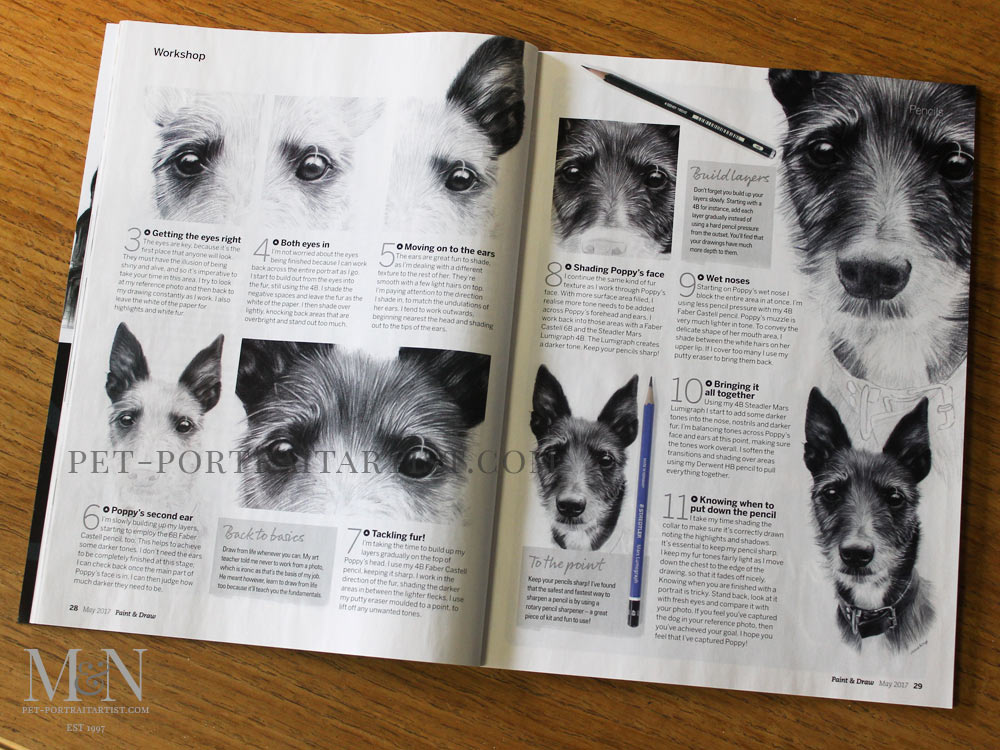
Throughout the article, I shared step by step photos showing how I build up a portrait from initial outline to final shading. I focused on the subtle textures in Poppy’s fur, her gentle expression, and the importance of patience in drawing. Every portrait is different, but the fundamentals – good observation, solid reference photos and layering stay the same.
Creating Art for a Wider Audience
Being featured in a national magazine brought my work to a wider audience. I received some wonderful emails from readers, including aspiring artists who were inspired to try pet portraits for the first time. That, more than anything, made the experience incredibly rewarding. You can still access back issues of the magazine digitally and it was also turned into a video workshop on YouTube. I filmed various stages of the portrait for the feature, which was later edited and shared online – another exciting first for me!
Why I Love Sharing the Process
While the final portrait is always the goal, I believe there’s great value in sharing how it comes together. For artists just starting out, it can be helpful to see that drawings don’t arrive on the page fully formed. It’s a process of refining, checking, and adjusting. For clients and dog lovers, it’s often fascinating to see their pet come to life from that very first sketch to the last detail. It adds a layer of connection between the portrait and the person who will treasure it.
Want to See More?
If you haven’t seen the finished drawing of Poppy, take a look at the full story on her dedicated page for the pet portrait commission. Pencil Pet Portrait of Poppy.
I’d would officially like to thank Adam Lafosse for allowing me to create the step by step while drawing his dog Poppy. I would like to think that both Poppy and I have achieved our 15 minutes of fame. Thank you so much for reading and being part of this journey with me!
Contact Us!
If you have a question or you would like to commission a portrait, contact us at any time. Don’t forget to subscribe to our YouTube Channel too.
Congratulations Mel, brilliant to see your artwork in print. I’m sure it will inspire and help many future artists.
Thank you so much Karie-Ann 😀 Thank you!! I hope that everything is going well for you and you are busy busy 😀 Melanie xx
Must have been a lot of work – off to get my copy today!
Hi Hillary! 😀 Fantastic!!!! I really hope you enjoy reading it. The magazine has some lovely pieces of artwork in too 🙂 Melanie x
I’m new at portraits and find getting the likeness difficult. I work with grids to assist me but that doesn’t seem to be enough sometimes. Do you have any suggestions for this?
P.s. your work is absolutely fantastic!
Hi Courtney,
Thank you for your lovely comments, I’m so glad you enjoyed the magazine article! 😀
I use to give my students lots of techniques to use when working from photos. Gridding is quite a popular one and a good starting point. I recommend using as many of the different techniques you can, especially at the start of the drawing as getting the fundamentals is key before you start adding any tone. The basics must be correct.
The one I used to recommend a lot is the measuring technique. Lets say for instance you have sketched your dog out and you have a photo that you are working from printed the same size. Get a ruler and measure the distance between the eyes and compare it on your drawing. You can then amend if necessary. Move on to measuring another point – i.e. eye to ear, top of head to nose, diagonal from eye to cheek etc. You can almost map out and check the entire drawing to make sure its basic lines are correct.
The other I would recommend once that was done was looking at the drawing and the photo in a mirror, or upside down. These can really help show the differences as your eyes are seeing it completely differently and so you notice if there are any areas incorrect.
Spot the difference is my favourite. Lets say you felt there wasn’t something quite correct about the eye – at any stage in the drawing process. Place the photo overlapping the drawing and look between the photo of the eye and your drawing of the eye. Keep looking back and forth, just like when you are trying to do a spot the difference drawing game. Keep repeating and you ‘should’ be able to see differences between the two. You can do this on individual areas and as a whole.
Of course coupled with this, I always recommend working from life daily when you are learning as this really helps you improve your observational skills – which in turn will help when you are working from photos. I use to give my students challenges and set them 7 things to find from their home which they found interesting – something with texture, something shiny, something spiky, something odd looking etc and draw every day and date each one. Then at the end of the week compare each drawing and see if you can see improvement and development. They always did!!!!
Drawing anything from life, whether it be your coffee mug and biscuit at 11 am or a pile of washing and an iron, a discarded shoe or boot – there are so many things around us in every day life that can be drawn. You can make it interesting by placing it next to a strong light source and creating all of the lovely light and shadows, textures, shine etc. Much fun!
I really hope that helps and I wish you the best of luck with your drawings. Enjoy it and have fun!!! 🙂
Melanie x